OSGi(Open Service Gateway Initiative),其英文定义为:The Dynamic Module System for Java。由此可见,OSGi的主要职责就是为了让开发者能够构建动态化、模块化的Java系统。使用OSGi,系统的各个组件就像插件一样,暴露特定的接口,实现“即插即用”。
1. OSGi的基本概念
1.1 bundle
在OSGi中,各个组件以bundle的形式存在,但从形式上讲,bundle也就是在META-INF目录下的MANIFEST.MF文件中加入了OSGi特定描述的jar包。bundle的生命周期被OSGi框架所管理,具有如下几个状态:INSTALLED, RESOLVED,STARTING, ACTIVE, STOPPING, UNINSTALLED。bundle各个生命周期状态的转换如下图所示:

bundle通过配置jar包中的MANIFEST.MF文件控制从bundle导出的包。而没有导出的包在bundle外部不能使用,这样就很好的完成了内部类和外部类的隔离。bundle可以被动态的安装、启动、停止和卸载。bundle是服务(Service)和组件(Component)的载体。事实上,不管是通过BundleContext注册和获取服务的方式,还是Declarative Service进行声明注入的方式,都是在编写bundle。
在OSGi中,每个bundle都有独立于其它bundle的ClassLoader,正因为这样,各个bundle的类是相互隔离的。但一个bundle可能会用到另外一个bundle的类,bundle之间的交户通过以下三种方式实现:
Export-Package:根据OSGi规范,每个工程可以通过声明Export-Package对外提供访问此工程中的类和接口,可以先把bundle导出,再导入到需要调用的bundle中,默认情况下一个bundle中所有的Package对外都是不可见的。
OSGi服务:通过将要对外提供功能声明为OSGi的服务实现面向接口、面向服务式的设计。一个bundle作为Service的提供方,对外提供Service,使用者可以查找到提供的Service。提供使用Service有三种方式:
- 通过BundleContext(bundle的上下文)来提供和获取;
- 使用Declarative Service来获取;
- 使用Blueprint来获取;
Event:OSGi的Event服务也是实现模块交互的一种可选方法,模块对外发布事件,订阅了此事件的模块就会相应地接收到消息,从而做出反应,以达到交互的目的。
1.2 OSGi Service
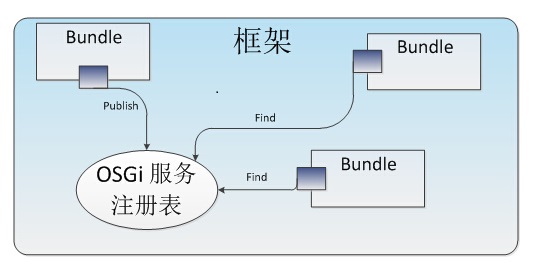
一个OSGi Service就是注册到OSGi框架中的Java对象的引用。在注册的时候可以设置这个Service的属性,从而在获取Service的时候可以进行过滤。OSGi拥有一个集中的服务注册中心,它遵循发布-查询-绑定模型,如下图所示。

bundle可以通过bundle的上下文去注册Service或去查询Service,获取对应服务的对象引用。当然还有其它方式实现OSGi Service,就是上面提到的声明式服务和Blueprint服务。关于OSGi Service使用方式的选择问题,参考:
后面的例子将介绍使用BundleContext注册和获取OSGi Service。
1.3 OSGi框架
OSGi框架可以看做实现了OSGi规范的容器,使用OSGi框架,可以实现各种bundle的“即插即用”,目前流行的框架包括Equinox和Felix,下面的简单应用是基于Felix框架实现的。
2. 基于OSGi框架(Felix)简单应用的实现
下面将介绍使用Maven工具和Felix框架实现OSGi简单应用,源码链接:
2.1 使用BundleContext注册和获取OSGi Service
使用两个bundle分别实现服务的注册和获取,由服务提供者(Service Provider)注册OSGi服务,服务消费者(Service Consumer)获取服务,Service Provider使用接口提供服务,而Service Consumer也将使用接口获取对应服务的实例化对象。
2.1.1 定义服务并注册
定义服务接口HelloWorldService
1
2
3
4
5
package org.hhb.osgi.provider.api;
public interface HelloWorldService {
public void hello();
}实现服务HelloWorldServiceImpl
1
2
3
4
5
6
7
8
9
10
package org.hhb.osgi.provider.impl;
import org.hhb.osgi.provider.api.HelloWorldService;
public class HelloWorldServiceImpl implements HelloWorldService {
@Override
public void hello(){
System.out.println("Hello World !");
}
}实现BundleActivator接口注册服务并实例化服务对象
1
2
3
4
5
6
7
8
9
10
11
12
13
14
15
16
17
18
19
20
21
22
23
24
package org.hhb.osgi.provider;
import org.hhb.osgi.provider.api.HelloWorldService;
import org.hhb.osgi.provider.impl.HelloWorldServiceImpl;
import org.osgi.framework.BundleActivator;
import org.osgi.framework.BundleContext;
import org.osgi.framework.ServiceRegistration;
public class HelloActivator implements BundleActivator {
private ServiceRegistration registration;
@Override
public void start(BundleContext bundleContext) throws Exception {
registration = bundleContext.registerService(
HelloWorldService.class.getName(),
new HelloWorldServiceImpl(),
null);
}
@Override
public void stop(BundleContext bundleContext) throws Exception {
registration.unregister();
}
}需要注意的是,上面的start和stop方法将分别在bundle start和stop时被调用。
使用maven-bundle-plugin插件打包bundle
1
2
3
4
5
6
7
8
9
10
11
12
13
14
15
16
17
18
19
20
21
22
23
24
25
26
27
28
29
30
31
32
33
34
35
36
37
38
39
40
41
42
43
44
45
46
47
48
49
<?xml version="1.0" encoding="UTF-8"?>
<project xmlns="http://maven.apache.org/POM/4.0.0"
xmlns:xsi="http://www.w3.org/2001/XMLSchema-instance"
xsi:schemaLocation="http://maven.apache.org/POM/4.0.0 http://maven.apache.org/xsd/maven-4.0.0.xsd">
<modelVersion>4.0.0</modelVersion>
<groupId>org.hhb</groupId>
<artifactId>osgi-provider</artifactId>
<version>1.0-SNAPSHOT</version>
<packaging>bundle</packaging>
<build>
<plugins>
<plugin>
<groupId>org.apache.felix</groupId>
<artifactId>maven-bundle-plugin</artifactId>
<version>2.4.0</version>
<extensions>true</extensions>
<configuration>
<instructions>
<Bundle-SymbolicName>${pom.groupId}.${pom.artifactId}</Bundle-SymbolicName>
<Bundle-Vendor>Apache Felix</Bundle-Vendor>
<Bundle-Activator>org.hhb.osgi.provider.HelloActivator</Bundle-Activator>
</instructions>
</configuration>
</plugin>
<plugin>
<groupId>org.apache.maven.plugins</groupId>
<artifactId>maven-compiler-plugin</artifactId>
<configuration>
<source>1.8</source>
<target>1.8</target>
</configuration>
</plugin>
</plugins>
</build>
<dependencies>
<dependency>
<groupId>org.apache.felix</groupId>
<artifactId>org.osgi.core</artifactId>
<version>1.4.0</version>
<scope>provided</scope>
</dependency>
</dependencies>
</project>这样编译打包后,就会在jar包下的META-INF文件夹下生成一个描述bundle信息的MANIFEST.MF文件。
2.1.2 获取并使用服务
定义服务消费类HelloWorldConsumer
1
2
3
4
5
6
7
8
9
10
11
12
13
14
15
16
17
18
19
20
21
22
23
24
25
26
27
28
29
30
31
32
33
34
package org.hhb.osgi.consumer;
import javax.swing.Timer;
import java.awt.event.ActionEvent;
import java.awt.event.ActionListener;
import org.hhb.osgi.provider.api.HelloWorldService;
public class HelloWorldConsumer implements ActionListener {
private final HelloWorldService service;
private final Timer timer;
public HelloWorldConsumer(HelloWorldService service) {
super();
this.service = service;
timer = new Timer(1000, this);
}
public void startTimer(){
timer.start();
}
public void stopTimer() {
timer.stop();
}
@Override
public void actionPerformed(ActionEvent e) {
service.hello();
}
}使用BundleContext获取服务并使用
1
2
3
4
5
6
7
8
9
10
11
12
13
14
15
16
17
18
19
20
21
22
23
24
package org.hhb.osgi.consumer;
import org.osgi.framework.BundleActivator;
import org.osgi.framework.BundleContext;
import org.osgi.framework.ServiceReference;
import org.hhb.osgi.provider.api.HelloWorldService;
public class HelloWorldActivator implements BundleActivator {
private HelloWorldConsumer consumer;
@Override
public void start(BundleContext bundleContext) throws Exception {
ServiceReference reference = bundleContext.getServiceReference(HelloWorldService.class.getName());
consumer = new HelloWorldConsumer((HelloWorldService) bundleContext.getService(reference));
consumer.startTimer();
}
@Override
public void stop(BundleContext bundleContext) throws Exception {
consumer.stopTimer();
}
}pom文件配置
1
2
3
4
5
6
7
8
9
10
11
12
13
14
15
16
17
18
19
20
21
22
23
24
25
26
27
28
29
30
31
32
33
34
35
36
37
38
39
40
41
42
43
44
45
46
47
48
49
50
51
52
53
54
55
56
57
58
59
60
61
62
63
64
65
66
67
<project xmlns="http://maven.apache.org/POM/4.0.0" xmlns:xsi="http://www.w3.org/2001/XMLSchema-instance"
xsi:schemaLocation="http://maven.apache.org/POM/4.0.0 http://maven.apache.org/xsd/maven-4.0.0.xsd">
<modelVersion>4.0.0</modelVersion>
<groupId>org.hhb</groupId>
<artifactId>osgi-consumer</artifactId>
<version>1.0-SNAPSHOT</version>
<packaging>bundle</packaging>
<name>osgi-consumer</name>
<url>http://maven.apache.org</url>
<properties>
<project.build.sourceEncoding>UTF-8</project.build.sourceEncoding>
</properties>
<dependencies>
<dependency>
<groupId>org.apache.felix</groupId>
<artifactId>org.osgi.core</artifactId>
<version>1.4.0</version>
<scope>provided</scope>
</dependency>
<dependency>
<groupId>junit</groupId>
<artifactId>junit</artifactId>
<version>3.8.1</version>
<scope>test</scope>
</dependency>
<dependency>
<groupId>org.hhb</groupId>
<artifactId>osgi-provider</artifactId>
<version>1.0-SNAPSHOT</version>
</dependency>
</dependencies>
<build>
<plugins>
<plugin>
<groupId>org.apache.felix</groupId>
<artifactId>maven-bundle-plugin</artifactId>
<version>2.4.0</version>
<extensions>true</extensions>
<configuration>
<instructions>
<Bundle-SymbolicName>${pom.groupId}.${pom.artifactId}</Bundle-SymbolicName>
<Bundle-Vendor>Apache Felix</Bundle-Vendor>
<Bundle-Activator>org.hhb.osgi.consumer.HelloWorldActivator</Bundle-Activator>
</instructions>
</configuration>
</plugin>
<plugin>
<groupId>org.apache.maven.plugins</groupId>
<artifactId>maven-compiler-plugin</artifactId>
<configuration>
<source>1.8</source>
<target>1.8</target>
</configuration>
</plugin>
</plugins>
</build>
</project>
2.1.3 在Felix中运行服务
- 下载Felix Framework Distribution
运行Felix
1
2
3
4
5
$java -jar bin/felex.jar
____________________________
Welcome to Apache Felix Gogo
g!运行bundle
1
2
3
4
5
6
7
8
9
10
11
12
13
g!
g! install file:../osgi/osgi-provider-1.0-SNAPSHOT.jar 11:01:54
bundle ID: 8
g! start 8 11:02:02
g! install file:../osgi/osgi-consumer-1.0-SNAPSHOT.jar 11:02:08
bundle ID: 9
g! start 9 11:02:16
g! Hello World ! 11:02:19
Hello World !
Hello World !
Hello World !
Hello World !
stop 9其中file:../osgi/osgi-consumer-1.0-SNAPSHOT.jar表示bundle文件的路径。
2.2 使用Export-Package提供Package给其它bundle使用
很多情况下在bundle使用第三方库,如Guava,Netty时,并不希望以服务的方式获取,而希望使用Import Package就可以获取对应的包。而默认情况下,不同bundle中的包是相互隔离的,这时就需要使用Export-Package导出bundle中的包给其它bundle使用。
2.2.1 产生bundle并Export Package
- 定义接口HelloWorldService(同上)
- 接口实现类HelloWorldServiceImpl(同上)
配置pom
1
2
3
4
5
6
7
8
9
10
11
12
13
14
15
16
17
18
19
20
21
22
23
24
25
26
27
28
29
30
31
32
33
34
35
36
37
38
39
40
41
42
43
44
45
46
47
48
49
<?xml version="1.0" encoding="UTF-8"?>
<project xmlns="http://maven.apache.org/POM/4.0.0"
xmlns:xsi="http://www.w3.org/2001/XMLSchema-instance"
xsi:schemaLocation="http://maven.apache.org/POM/4.0.0 http://maven.apache.org/xsd/maven-4.0.0.xsd">
<modelVersion>4.0.0</modelVersion>
<groupId>org.hhb</groupId>
<artifactId>osgi-provider</artifactId>
<version>1.0-SNAPSHOT</version>
<packaging>bundle</packaging>
<build>
<plugins>
<plugin>
<groupId>org.apache.felix</groupId>
<artifactId>maven-bundle-plugin</artifactId>
<version>2.4.0</version>
<extensions>true</extensions>
<configuration>
<instructions>
<Bundle-SymbolicName>${pom.groupId}.${pom.artifactId}</Bundle-SymbolicName>
<Bundle-Vendor>Apache Felix</Bundle-Vendor>
<Export-Package>org.hhb.osgi.provider.api, org.hhb.osgi.provider.impl</Export-Package>
</instructions>
</configuration>
</plugin>
<plugin>
<groupId>org.apache.maven.plugins</groupId>
<artifactId>maven-compiler-plugin</artifactId>
<configuration>
<source>1.8</source>
<target>1.8</target>
</configuration>
</plugin>
</plugins>
</build>
<dependencies>
<dependency>
<groupId>org.apache.felix</groupId>
<artifactId>org.osgi.core</artifactId>
<version>1.4.0</version>
<scope>provided</scope>
</dependency>
</dependencies>
</project>需要注意的是,激活器(bundle-Activator)对一个bundle来说不是必需的,也就是说,bundle的start过程并处于Active状态并不需要bundle-Activator。只有当构建一个bundle,并需要与OSGi API进行交换时,或者需要执行自定义的初始化/销毁动作,激活器才是必须的。事实上,前面使用bundle-Activator主要是为了注册服务并实例化服务对象,这样其它bundle就可以直接使用该服务了。
2.2.2 在另一bundle种使用外部包
定义服务消费类HelloWorldConsumer(同上)
Import Package并使用
1
2
3
4
5
6
7
8
9
10
11
12
13
14
15
16
17
18
19
20
21
22
23
24
25
26
27
28
29
30
package org.hhb.osgi.consumer;
import com.google.common.collect.Lists;
import org.osgi.framework.BundleActivator;
import org.osgi.framework.BundleContext;
import org.hhb.osgi.provider.impl.HelloWorldServiceImpl;
import java.util.List;
public class HelloWorldActivator implements BundleActivator {
private HelloWorldConsumer consumer;
@Override
public void start(BundleContext bundleContext) throws Exception {
//test for using third-party dependency package
List<String> strings = Lists.newArrayList("I", "use", "guava", "here");
System.out.println(strings);
//test for using my customized dependency package
//ServiceReference reference = bundleContext.getServiceReference(HelloWorldService.class.getName());
consumer = new HelloWorldConsumer(new HelloWorldServiceImpl());
consumer.startTimer();
}
@Override
public void stop(BundleContext bundleContext) throws Exception {
consumer.stopTimer();
}
}pom的配置(同上)
需要注意的是,maven-bundle-plugin会根据类中声明的import的包信息导入所有的Package并写入MANIFEST-MF文件的Import-Package字段中,若自己在pom中定义Import-Package信息,需要注意不要遗漏相关的Package。
1
2
3
4
5
6
7
8
9
10
11
12
13
14
15
16
<plugin>
<groupId>org.apache.felix</groupId>
<artifactId>maven-bundle-plugin</artifactId>
<version>2.4.0</version>
<extensions>true</extensions>
<configuration>
<instructions>
<Bundle-SymbolicName>${pom.groupId}.${pom.artifactId}</Bundle-SymbolicName>
<Bundle-Vendor>Apache Felix</Bundle-Vendor>
<Bundle-Activator>org.hhb.osgi.consumer.HelloWorldActivator</Bundle-Activator>
<!--<Import-Package>com.google.common.collect,javax.swing,org.osgi.framework,
org.hhb.osgi.provider.api,org.hhb.osgi.provider.impl</Import-Package>-->
</instructions>
</configuration>
</plugin>
2.2.3 在Felix中运行服务
同上
2.2.4 bundle中使用外部包总结
在Java程序中,用到外部包中的类几乎是必然的事情,在OSGI和MAVEN环境下,引用外部包的方法总结如下:
java.开头的包,是JDK提供了,代码中直接import。
org.osgi开头的(包括core、compendium等),是osgi规范提供的,已经包含在osgi框架(Felix)中,开发时需要导入,但是发布程序中不需要包含,由Felix提供,实现方法是添加scope为provided的maven依赖,如:
1
2
3
4
5
6
<dependency>
<groupId>org.apache.felix</groupId>
<artifactId>org.osgi.core</artifactId>
<version>1.4.0</version>
<scope>provided</scope>
</dependency>第三方jar包,可能有多个bundle共享的,直接osgi化,然后作为独立bundle安装到Felix中,如Guava,部署时只要将这些包作为一个独立的bundle并启动,其他bundle就可以通过直接Import-Package的方式来引用这些包。之所以能够这么做是因为这个jar已经osgi化了,查看jar包中的META-INF/MENIFEST.MF文件,可以看到这些jar包Export的包信息。
- 第三方的jar包,不考虑多个bundle共享,只确保一个bundle的独立依赖,可以把这些依赖的jar嵌入到开发的bundle中发布。maven中加入这些jar包的dependency的依赖项就可以在开发时引用了,但是发布到Felix框架时,我们要把这些jar包一起提供才行,方法是把这些jar包嵌入到我们的bundle中,使用maven-bundle-plugin,增加instructions配置
*;scope=compile|runtime ,这样maven在打包是就可以自动把这些依赖的jar包嵌入。要注意这些依赖的scope和Embed-Dependency的表述方式的匹配,具体Embed-Dependency可能的写法请参见maven-bundle-plugin在线文档。